How to reset Tuya's Zigbee module and configure the network?
When receiving the module, it is suggested that, before start coding, you run the provided module debugging assistant, and connect the Zigbee module in MCU simulation mode to check if the module can work properly. Meanwhile, you can get familiar with the protocol interaction process, which will help you to proceed with development debugging.
In MCU simulation mode, the debugging assistant simulates the MCU to automatically respond to the module with the correct protocol data. After you configure the network through the mobile phone, you can test DP data reporting and sending. The procedure of operating the assistant and module network configuration is as follows. Before the operation, you need to learn about the operation instruction of the Tuya module debugging assistant. For beginners, see Module Debugging Assistant Instruction.
- Based on the schematic diagram of the minimum system, you build the peripheral circuit of the module and jump the wire directly in case of simple testing.
- Open the debugging assistant in the development documents, and import the debugging file. Select the Zigbee general protocol and MCU simulation mode.
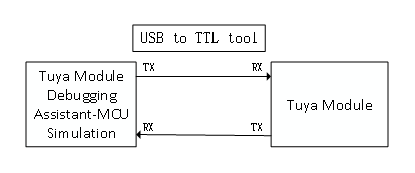
- Connect the module serial port to the computer through a USB-to-TTL adapter, and select the corresponding serial port and Baud in the assistant. After you open the serial port and click Start, you will see the initial protocol interaction between the module and the host.Note: If the module does not send data after power on, check if the peripheral circuit of the module is correct.
- Click Configure Module, and the module enters network configuration mode. Configure network on the app according to the status. See the app operation instruction for network configuration operation.Note: Before configuring a sub-device, you need to configure the network of the gateway on the Tuya Smart app or Smart Life app. Then, the Zigbee sub-device can be added. For more information, see the documentation Zigbee Network Configuration Description.
